Dec 16, 2010

50+ Saying Block Letters...

As I mentioned in my last post, I participated in the Handmade Gift Exchange over at Craftaholics Anonymous. I was paired with the fabulous Angela over at Comfie Corner Crafts. I decided to make her these blocks I saw at a friends house awhile back. I've been wanting to make them for myself but still haven't gotten around to it. (Isn't that how it always turns out?)

Anyway, I've gotten a lot of great feedback on the blocks from my friends and family, I decided to do my first tutorial! And yes, I'm going to make these again.

First off, you start with 15 square blocks. You can do 2 1/2x2 1/2 or 3x3, whatever size you prefer. I think I used 3x3. I went to Lowe's and had them cut my wood down to size. I know places such as Wood Connection has square blocks already pre-cut, but are a little more expensive. Lowes does not charge to cut the wood.

Before you start your project, of course, you need to sand, sand, sand. This by far was the most time consuming part of the whole thing. You may want to use a power hand sander... I definitely will for the next time around. 15 blocks is a lot to sand... just saying.

Next, stain the blocks using a darker color stain. You really only need to do the edges because you are going to cover the sides in cute scrapbook paper.

After your stain has dried, cut your scrapbook paper down to size. On this one, I chose to put the same paper on the front and back, then another paper on the 2 sides, and another paper on the top. I think the next time I do it, I'm going to use the same paper on all 4 sides, then a different paper on the top. You can deifnitely do this anyway you want. I like the look of seeing the paper on top that you are using on the sides as well. It brings all the blocks together. (In my opinion.) Be sure not to cover the bottom, you need to write the number of the block on it. Also, because your blocks can be used YEAR ROUND, you probably want to avoid the seasonal paper prints.


Once you are done Mod Podge-ing the paper on, it's time to cut the letters. By this point, I was ready to be done. I wont lie. I used my trusty NEW Cricut (yes, I got a new one on Black Friday!) and I cut the letters out of vinyl using the Sure Cuts A Lot program. (If I haven't said it enough, I LOVE SCAL!) If you dont have this awesome program, you can use any letter cartridge or even just print and cut the letters out yourself. If you don't use vinyl, just use your trusty Mod Podge again and glue them on. I did this for the Christmas Tree and the other decals I wanted in a different color. Also, I used black for my letters, you can use any color you want. If you are lazy like me and decide to use vinyl, it might be a good idea to paint over them with Mod Podge (which I didn't do because again, I was ready to be DONE! HAHA.)


 As you are glueing/putting your letters on each block, be sure to number the bottom of each block. With the #'s 6 and 9, be sure to underline which the bottom is so you dont get them mixed up.


Once you are done, you can use the free downloadable cheat sheet to see what letter combinations will spell what! Below is another Christmas-y saying that you can create with your new blocks!! Check out the cheat sheet for other ideas. You can use them YEAR ROUND!


Handmade Gift Exchange

Remember when I said I entered in the Handmade gift exchange over at Craftaholics Anonymous? Well, I'm finally posting about what I sent to my awesome partner and new friend, Angela, over at Comfie Country Crafts. I wanted to brag about and show what I received! She was so sweet! She is an excellent crochet-er (is that a word? haha).

First of all, she made the cutest Christmas card she included! How cute is that! I didn't even think to put a card in my package to her. I felt really bad... sorry!! She also made me an adorable Christmas apron that I've already worn a few times. Also, she made me a cute beenie hat! But she didnt stop there! She also made one for the baby! Totally love them all! Thank you SO much!!!


Below is the gift I made for her. I'll post a tutorial on it soon:

Dec 10, 2010

Thanksgiving Point Family Pass


If you love Thanksgiving Point as much as I do, you don't want to miss the give-away going on over at A Little Tipsy and less cake {more frosting}! They are both giving away an Annual Family Pass to Thanksgiving Point. How great is that?! Go on over and enter to win!


Nov 25, 2010

"Give Thanks" Blessing Board

Earlier this week, I finally made my "Give Thanks" blessing board I saw from Whipperberry on Tatertots & Jello. Here's my version of her blessing board.

I had a lot of fun making this. I didn't take any before or during pics but I found this super ugly, gold picture frame from the fabulous D.I. (local thrift store). It had a weird picture in it and I was almost embarrassed buying it, it was that ugly and weird! I brought it home and painted it a super cute green color. I used my Cricut to cut out the 'Give Thanks' sign using vinyl I had on hand and stuck it on a piece of green cardstock, also had on hand. I picked up some wooden clothes pins and painted them the same green. I also picked up some twine and strung it back and forth from the staples that were already in the back from the picture before. Whipperberry had a free printable for the cards, which I just printed on cardstock.

For FHE this week, we took turns saying and writing down the things in which we are grateful for this season. I thought it was fitting to help get us in the Thanksgiving spirit.

Nov 24, 2010

Shutterfly's 50 free Holiday Cards for Bloggers

Many of you may have already heard of this awesome promotion that Shutterfly is doing this year...but I'll tell you again! I love Shutterfly's photo merchandise. I've ordered my holiday cards from them in the past and have loved how they have turned out. I'm thrilled to be able to order again from their Holiday Card Collection this year! Who can pass up their fresh and colorful designs.... plus bloggers get 50 FREE cards! What could be better?! I have never been disappointed in their products or delivery. Don't forget their special offers right now, including free shipping if you spend 30 dollars or more! Why is free shipping so awesome!? Also, think Christmas Gifts: Canvas Wall Art, Personalized Mugs, Calendars or fun Ornaments!
Want in on 50 FREE Holiday Cards?
Bloggers get 50 free holiday cards from Shutterfly… sign up:http://www.blogger.com/goog_951089126ly/sfly2010


What should you expect in the mail from us? Thats a great question! This is almost as hard as picking the picture that will go on it! (For different reasons, of course, these I actually like!) Here are a few of my favorites from their Flat Stationary Cards:

Elegant Cranberry Damask Christmas Card

See what I mean with the hard choices? These are just a few of them too! Another thing I'm excited for is they have an adorable selection of baby boy announcements too! Watch for those in the next.... ugh, it's too depressing to think how much longer. :)


Nov 22, 2010

Gingerbread Houses

I'm so excited for Christmas this year. Every year, we make Ginger Bread Houses with some good friends. I just came across this super easy recipe over at WhipperBerry for homemade ginger bread! My mom gave me a mold for the houses a few years back and because I've always worked full time, I've never had time to actually make them. Not this year though, this is the year for the HOME MADE ginger bread! We probably still wont eat them, but at least we could if we wanted.

Check out how cute hers turned out. She has a big party every year and makes everyones for them! Now that's love! (I'll post ours next month after we do them.)


Nov 19, 2010

Thankful Banner

I can knock one of the projects off my list. Thanks to Centsational Girl, I got this cute Idea for a Thankful Banner to go over my fireplace. I don't have a lot of Thanksgiving decorations, I don't know why and this was super easy! The glitter was the hardest part and thats just because it's messy. Anyway, I now have a total of 4 things that are fall/Thanksgiving decor. I used fake leaves so they will last until next year and I didn't put them between all the letters. I also did all the same paper background. Which I looked at hers again after I was done and think I liked hers better. Oh well.


Nov 11, 2010

Playing with the Cricut and Sure Cuts A Lot

I've been in the crafty mood lately... I bought this awesome new program Sure Cuts A Lot for my Cricut. I don't know why I didn't buy it sooner! It's awesome!

This is the No Soliciting sign I put on the window next to our door a few weeks ago. So far, we have only gotten 1 flier, hopefully the rest see it and are actually paying attention to it.

This is the Welcome sign I put on the center of our door. What do you think?

I found these images online and my awesome new program just cuts it out on my Cricut. Did I mention that I LOVE IT!??? Now I want to get the bigger Cricut machine!

Nov 10, 2010

Projects I'm looking forward to do:

A 2-in-1 Holiday Trio from Lolly Jane Boutique
Give Thanks Blessing Board from WhipperBerry on Tatertots and Jello
The What-cha-ma-call-it Shelf at The Yellow Cape Cod
A Thankful Banner from Centsational Girl


A Paper Organizer from Drab to Fab

Chalkboard Plate from Not So Idle Hands

Cute Photo Block from Fresh Poppy Design
A Cinderella Story Bench Makeover from Christina's Adventures
Nursery Wall Paneling from Fresh Poppy Design
  

Tie applique onesie from Fresh Poppy Design


Nov 3, 2010

Handmade Gift Exchange

I just signed up for this Handmade Gift Exchange over at Craftaholics Anonymous. It sounds like so much fun!! You should sign up for it too. The more the merrier, right? She hosts a gift exchange twice a year, once in July and once in November. This time around, you have until Nov. 10th to sign up!!

I linked her blog above but you can also check out the rules below:


It's that time again! Twice a year I host a Handmade Gift Exchange here on Craftaholics Anonymous and its time sign up! I look forward to these exchanges for months. It's seriously is one of my fave things that I do with this blog. Such a fun way to meet other crafters AND have an excuse to be crafty :]

Since this exchange has grown quite a bit since I started it, I am gong to format it differently this time around in hopes to prevent some of the headaches we had last time. With this exchange, you will send your gift to the same person that sends you a gift. For ex: I make and send a gift to Jane Crafty and in return, Jane Crafty will make and send me a gift.
 

Want to see what participants have received in the past? Check out last Gift Exchange's linky party here.

Please read this entire post BEFORE you sign up! If you have any questions, PLEASE email me at craftaholicsanon@gmail.com before signing up. Wanna play? Here's how to be a part of the UNITED STATES Gift Exchange December 2010
  • If you commit to participate in this exchange, you will need to make one Handmade Gift for a fellow blogger and have it post marked by November 30, 2010. In return, you will receive one Handmade Gift from a fellow blogger in the mail some time in December.
  • Fill out the form below to officially sign up. Sign up will be open until November 10, 2010.
  • After sign up closes, I will personally email you with your "Gift Exchange Partner's" mailing address and email address.
  • Make a gift for your assigned partner. Need ideas? Check out my Tutorials.
  • Have your gift post marked no later than November 30, 2010. It is very important that you have your gift post marked by November 30. If you can get your handmade gift in the mail earlier, that's even better! 
  • Participating in this exchange means you will probably have to make a trip to the Post Office. Please take that into account when you're looking at your holiday schedule.
  • There is no skill level required. A handmade gift is always wonderful, no matter how technical it is! 
  • There is no price minimum on the handmade gift. If shipping costs are an issue, you can make a gift that is light weight and fits inside an envelope. 
  • I have no way of patrolling everyone's participation....but usually, people are honest and do their part. And with this new format, you will have your partner's info so you can help remind them as needed ;o)

Oct 9, 2010

How cute are these???

One of the cutest shops, Santa's Gift Shoppe, is having an adorable Halloween Give Away for having 1000+ followers! You need to check it out and enter the contest! I want to win the 2nd one pictured:


OR


Be sure to head over to Santa's Gift Shope and enter for yourself too!!!

May 22, 2010

My first Eclairs!

x
Anyone that has known my family, especially my mom or grandma know about their famous eclairs. They are to die for, if I might say. Today I decided to attempt them on my own for the very first time. I think they turned out pretty good. I had an issue with the frosting but other than that, it was a breeze! I can't wait to eat them tonight. Oh and Happy Birthday Rebecca. Thanks for asking for them. It forced me to actually make them myself. 

May 12, 2010

Activity Days

I just have to say how much I love my calling!! I am the Acitivity Days leader for the 9-10 yr olds. It really makes me think outside the box. We made the cutest craft that we used for Mothers day.
  • Take a can of mandarin oranges and open it from the bottom with a pampered chef can opener. You need the kind of can with the Pop Top lid (This will take the metal off with out leaving the shavings to cut you)
  • Dry the can completely and remove paper label
  • Cut your scrapbook paper to the desired height (For the cans with 2 layers, I did 2 inches of the top and 1.25 for the bottom. Or about 3 inches for 1 solid sheet)
  • Glue the paper around the can using Elmer's or Glue Dots
  • Decorate the can with any cut outs you desire
  • Tie ribbon around the Pop Top lid
  • Fill the can with your desired treat or gift of choice (we put candies and a hand written note from the girls for their mom's)
  • After the can is filled and decorated, glue the bottom back on to the can. You can use Elmer's or even a hot glue gun

    Jan 5, 2010

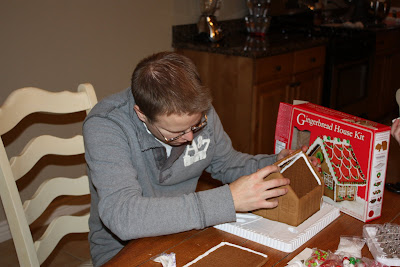
    Ginger Bread Houses

    We have a fun tradition with our good friends, Dallin and Emilee of making gingerbread houses. Dallin and Emilee are always way more creative than we are. Dustin and I have always just bought kits and made our gingerbread houses from those. This year, Dallin and Emilee did a gingerbread train. The coolest part was, they actually made their own gingerbread! I always say, next year, we will try making our own. Really, next year is the year! We are going to be creative AND with homemade gingerbread. I can just smell it now! :) Usually Dallin takes the longest, this year, it was me. I took so long that Dustin and I didn't even get our picture with our completed houses. My house was having problems, as usual. Something ALWAYS goes wrong with mine, the roof, the walls, the sprinkles, everything! It's still fun and something I look forward to each year. Thanks guys for such a fun tradition!