Showing posts with label Crafts. Show all posts

Oct 1, 2011

I finally made one for myself:

Remember when I made the 50+ Saying block letters for my gift exchange partner? Well, I FINALLY made myself one. Sadly, I like the 2nd one a lot better than the first so I had to share it. This is the project I was working on when I ran out of Mod Podge and made some of my own.

(You can find the link to the FREE Downloadable Cheet Sheet here)

I changed a few things:
  • Painted all my blocks black before staining. (If you choose to do this, you can paint just the corners that will show to save on paint and time.)
  • Chose only 4 coordinating papers
  • Added 1 extra block to put other seasonal pictures on it. (i.e. Shamrock, birdhouse, bunny, Christmas tree, etc. You can add what you like for the season.)
  • Did not put paper on top. I decided it looked too busy.
I like how this one turned out. My only problem now is where am I going to put it? My mantle is too full and as of right now, it is covering my adorable baby. I need another shelf perhaps.

Sep 14, 2011

Home Made Mod Podge

Last night I ran out of Mod Podge in the middle of a project. I had seen a pin on Pinterest from Do It Yourself Divas on how to make your own. I thought it made complete sense, so at 10:30 pm last night, I tried it out.
She suggested to do just equal parts of elmers glue and water. I found this super mega runny. I didn't love how watery it was because I was worried it would ruin my paper. (And at 10:30, I couldn't run to the store to get more of the paper I was using.) I added a little more emlers glue. It was still pretty runny but it still worked and did the trick. I woke up this morning to perfectly glued paper. So Cool!!!

I just used a baby food jar. (I didn't want to make too much in case I didn't like it, or it didn't work.) This picture was taken after I used it to finish my project.


DIY under $5

Sep 7, 2011

Halloween is right around the corner... YAY!!

I'm sad to see summer go, but I'm excited to get ready for Halloween at the same time. This is the first year I can dress my kid up and believe me, I'm so taking him trick-or-treating... Maybe just at the grandparents houses, but still, haha.

BUT, I'm also excited to start getting my Halloween Decor out and make new stuff too. This is just a few of my fav's that I took pics of last year. I don't have it up yet, don't worry. :)


This guy doesn't work on my fridge anymore, because the fridge is stainless steal. I tried it on the dishwasher (thats also stainless) and it worked great. Maybe it's not really stainless?

I'm not sure if I'm going to put this little lady up this year or not... I've had her for a few years and it might be time for a change. I do love her though. Tell me what you think.

Aug 31, 2011

Muga & Grandma Mothers Day Blocks

I know, I'm SO behind. That's what happens when you have a baby... over 6 months ago. :) I saw these adorable blocks on somebody elses blog. (Please tell me if it's yours. I want to give you credit.) I just tried searching for it with no such luck. They were super easy and really cheap! My husband said we didn't need to do anything for his mom for mother's day. I went ahead and made this for my mom and showed him. His response was, "Oh, my mom Would Love something like that." So I whipped out another one that morning for her. And of course, she did Love it!

I took 2 square blocks (some my dad had out in his wood shop.) And 1 larger block, the same width as the squares. Painted them an antique white. Sanded and stained them. Then Mod Podged 2 of my favorite pictures of my baby on the front of the squares. Cut the vinyl lettering with my fabulous Cricut. (Can't live without it.) And stuck that on the front of the larger block. I Mod Podged over the vinyl just to make sure it stayed on there. I finished it off by tying a wire lined ribbon (that was tied around a baby gift) around it and tied it in a bow on top. What do you think?


My mom had a great idea, that I'm still planning on doing for her... maybe for Christmas. :) Get 12 more blocks and put all the grand kids picture on each block. Then you can stack them around the saying block. Just an idea.

Aug 16, 2011

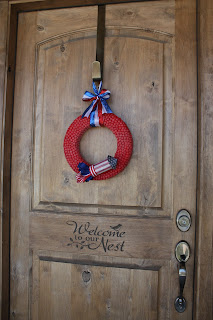
4th of July wreath

I saw this adorable 4th of July & (being in Utah) 24th of July wreath on Tatertots and Jello. Don't judge, hers turned out SOO much cuter than mine. :)


Items needed:
  • a couple bags of red hots
  • 2 festive scrapbook paper
  • red ribbon (to wrap around the wreath)
  • red & blue ribbon (to use on the rocket)
  • coordinating red, white and blue ribbon (to tie at the top to hang on the door)
  • (All of the above, I found at the dollar store)
  • foam craft wreath
  • hot glue gun & glue sticks
  • toilet paper roll

Get Started on wreath:
Wrap the entire foam wreath with red ribbon hot glueing every couple of wraps to keep the ribbon nice and tight around the wreath. (this is the background so you dont see white through the candies.)
Next, begin glueing the red hots around the entire wreath. You want to cover the entire wreath minus the back that will be against the door. I think I did the inside ring, then the top and finished with the outside ring. (this is by far, the longest part of this project.)
Finish by sealing the candy with Mod Podge Dimensional Magic. I used a polyurethane spray and it did not dry clear. (I was not happy but hung it up anyway.)

Now for the rocket:
Measure, cut & wrap the first scrapbook paper around toilet paper roll.
Then, measure and cut about a 1" circle from the 2nd paper. Cut the circle about half way to the center. Overlap the paper at the cut to form a cone. At desired shape and size, either glue or staple the cone in place. Glue the cone on top of the toilet paper roll.
Use ribbon to finish off the bottom edge of toilet paper roll.
With remaining ribbon, take 2 or 3 coordinating colors and make loops to give the rocket a "take off" feel. Glue to the inside of the bottom of the rocket. Play with the loops to make it your style.
Finally, glue the rocket on to the bottom of the rocket. Where ever you like it best.

Hang it up:
To hang it up, I took a thicker red, white and blue ribbon and tied a bow. With the same ribbon, I wrapped a loop around the top and tied a know. I took my bow and glued it to the front. That made sure the bow was always facing front.

Apr 18, 2011

Spring wreath

There are so many cute and adorable spring wreaths that have popped up all over blog land. I have been adoring them for so long. Today, I finally decided it was time to make mine. My door has been bare for too long.

I started by taking some scraps of fabric I had from a nursing cover I just made. I took 4 strips about 4x44 inches. I didn't measure these, it was just the length of the fabric by a couple inches think. I pinned one end of the strips in a styrofoam ring and started wrapping. And repeated until it was fully wrapped.


Next were the flowers. Again, more scraps that I had from my nursing cover. I took some strips about 2x44 (the width of the fabric x a few inches.) To begin, I tied a knot at the end of the strip for a starting point. Then started wrapping the fabric around the knot using hot glue every so often to keep the flower in tact. There are tutorials for this all over blog land too. They all intimidated me. I just did it and didn't worry about how any others looked. They probably aren't great, but they looked good to me. One of the flowers, I put a straight pin near the knot and wrapped the flower around it. It did hide the pin a little better, however, I only did this on one because I didn't think it helped that much.


Jan 6, 2011

Birthday & Anniversary Board

A while back, I saw something similar to this but can't remember for the life of me where.
I'm really sorry! I wish I could give her credit!


I decided months ago that I was going to make one for my mom for Christmas. The original one I saw only had birthday's but I decided to take it a step further and include anniversaries as well. Even though I decided months ago to do it, I really didn't make it until the few days before Christmas. I bought the frame and metal board from the wonderful Wood Connection and just painted the board black. 

I am not very good at scrap booking, so I cheated and created the months all on the computer and had them printed as a 4x6 picture at Walmart. I downloaded a whole bunch of really cute FREE digital scrapbook pages from the Shabby Princess. Did I mention, it was all FREE?? Best part! Then I took put a magnet on the back of each picture to put them on the metal board. If you didn't want to do the metal board, you could Mod Podge them on to the back of a normal frame or even on the glass of it.

Because I know our family is not complete, and probably never will be. My mom will want to continue adding names even for her great grand kids. I decided to print all the names on the same background I put the month on... Then Mod Podged them on the pictures. (Extra step that didn't need to be taken.) I didn't love how that turned out. If I had more time, I would have changed it before I gave it to her. If I liked my handwriting, I would have just written them all on with a black permanent marker. (Makes it the easiest way to add more names.) I'm still going to fix and re-do the months. I had the great idea just last night of printing the names on a clear label. That makes it an even easier way to add names to it. My mom can still write the new names on, or you can always print a new label for a new birth or marriage. 

To finish it off, I cut out our family name along with "Birthdays & Anniversaries" with the Cricut in white vinyl and stuck them on the top and bottom of the board. (Sorry I didn't take pictures of everything along the way. I actually finished this on Christmas day so I could give it to my mom.)


I'm linked up on:
lil luna link party button

Dec 16, 2010

50+ Saying Block Letters...

As I mentioned in my last post, I participated in the Handmade Gift Exchange over at Craftaholics Anonymous. I was paired with the fabulous Angela over at Comfie Corner Crafts. I decided to make her these blocks I saw at a friends house awhile back. I've been wanting to make them for myself but still haven't gotten around to it. (Isn't that how it always turns out?)

Anyway, I've gotten a lot of great feedback on the blocks from my friends and family, I decided to do my first tutorial! And yes, I'm going to make these again.

First off, you start with 15 square blocks. You can do 2 1/2x2 1/2 or 3x3, whatever size you prefer. I think I used 3x3. I went to Lowe's and had them cut my wood down to size. I know places such as Wood Connection has square blocks already pre-cut, but are a little more expensive. Lowes does not charge to cut the wood.

Before you start your project, of course, you need to sand, sand, sand. This by far was the most time consuming part of the whole thing. You may want to use a power hand sander... I definitely will for the next time around. 15 blocks is a lot to sand... just saying.

Next, stain the blocks using a darker color stain. You really only need to do the edges because you are going to cover the sides in cute scrapbook paper.

After your stain has dried, cut your scrapbook paper down to size. On this one, I chose to put the same paper on the front and back, then another paper on the 2 sides, and another paper on the top. I think the next time I do it, I'm going to use the same paper on all 4 sides, then a different paper on the top. You can deifnitely do this anyway you want. I like the look of seeing the paper on top that you are using on the sides as well. It brings all the blocks together. (In my opinion.) Be sure not to cover the bottom, you need to write the number of the block on it. Also, because your blocks can be used YEAR ROUND, you probably want to avoid the seasonal paper prints.


Once you are done Mod Podge-ing the paper on, it's time to cut the letters. By this point, I was ready to be done. I wont lie. I used my trusty NEW Cricut (yes, I got a new one on Black Friday!) and I cut the letters out of vinyl using the Sure Cuts A Lot program. (If I haven't said it enough, I LOVE SCAL!) If you dont have this awesome program, you can use any letter cartridge or even just print and cut the letters out yourself. If you don't use vinyl, just use your trusty Mod Podge again and glue them on. I did this for the Christmas Tree and the other decals I wanted in a different color. Also, I used black for my letters, you can use any color you want. If you are lazy like me and decide to use vinyl, it might be a good idea to paint over them with Mod Podge (which I didn't do because again, I was ready to be DONE! HAHA.)


 As you are glueing/putting your letters on each block, be sure to number the bottom of each block. With the #'s 6 and 9, be sure to underline which the bottom is so you dont get them mixed up.


Once you are done, you can use the free downloadable cheat sheet to see what letter combinations will spell what! Below is another Christmas-y saying that you can create with your new blocks!! Check out the cheat sheet for other ideas. You can use them YEAR ROUND!


Handmade Gift Exchange

Remember when I said I entered in the Handmade gift exchange over at Craftaholics Anonymous? Well, I'm finally posting about what I sent to my awesome partner and new friend, Angela, over at Comfie Country Crafts. I wanted to brag about and show what I received! She was so sweet! She is an excellent crochet-er (is that a word? haha).

First of all, she made the cutest Christmas card she included! How cute is that! I didn't even think to put a card in my package to her. I felt really bad... sorry!! She also made me an adorable Christmas apron that I've already worn a few times. Also, she made me a cute beenie hat! But she didnt stop there! She also made one for the baby! Totally love them all! Thank you SO much!!!


Below is the gift I made for her. I'll post a tutorial on it soon:

Nov 19, 2010

Thankful Banner

I can knock one of the projects off my list. Thanks to Centsational Girl, I got this cute Idea for a Thankful Banner to go over my fireplace. I don't have a lot of Thanksgiving decorations, I don't know why and this was super easy! The glitter was the hardest part and thats just because it's messy. Anyway, I now have a total of 4 things that are fall/Thanksgiving decor. I used fake leaves so they will last until next year and I didn't put them between all the letters. I also did all the same paper background. Which I looked at hers again after I was done and think I liked hers better. Oh well.


Nov 11, 2010

Playing with the Cricut and Sure Cuts A Lot

I've been in the crafty mood lately... I bought this awesome new program Sure Cuts A Lot for my Cricut. I don't know why I didn't buy it sooner! It's awesome!

This is the No Soliciting sign I put on the window next to our door a few weeks ago. So far, we have only gotten 1 flier, hopefully the rest see it and are actually paying attention to it.

This is the Welcome sign I put on the center of our door. What do you think?

I found these images online and my awesome new program just cuts it out on my Cricut. Did I mention that I LOVE IT!??? Now I want to get the bigger Cricut machine!

Nov 10, 2010

Projects I'm looking forward to do:

A 2-in-1 Holiday Trio from Lolly Jane Boutique
Give Thanks Blessing Board from WhipperBerry on Tatertots and Jello
The What-cha-ma-call-it Shelf at The Yellow Cape Cod
A Thankful Banner from Centsational Girl


A Paper Organizer from Drab to Fab

Chalkboard Plate from Not So Idle Hands

Cute Photo Block from Fresh Poppy Design
A Cinderella Story Bench Makeover from Christina's Adventures
Nursery Wall Paneling from Fresh Poppy Design
  

Tie applique onesie from Fresh Poppy Design