Showing posts with label Tutorial. Show all posts

Sep 14, 2011

Home Made Mod Podge

Last night I ran out of Mod Podge in the middle of a project. I had seen a pin on Pinterest from Do It Yourself Divas on how to make your own. I thought it made complete sense, so at 10:30 pm last night, I tried it out.
She suggested to do just equal parts of elmers glue and water. I found this super mega runny. I didn't love how watery it was because I was worried it would ruin my paper. (And at 10:30, I couldn't run to the store to get more of the paper I was using.) I added a little more emlers glue. It was still pretty runny but it still worked and did the trick. I woke up this morning to perfectly glued paper. So Cool!!!

I just used a baby food jar. (I didn't want to make too much in case I didn't like it, or it didn't work.) This picture was taken after I used it to finish my project.


DIY under $5

Aug 16, 2011

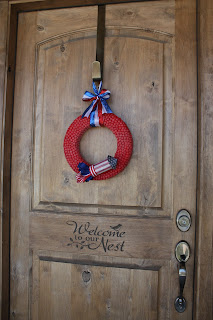
4th of July wreath

I saw this adorable 4th of July & (being in Utah) 24th of July wreath on Tatertots and Jello. Don't judge, hers turned out SOO much cuter than mine. :)


Items needed:
  • a couple bags of red hots
  • 2 festive scrapbook paper
  • red ribbon (to wrap around the wreath)
  • red & blue ribbon (to use on the rocket)
  • coordinating red, white and blue ribbon (to tie at the top to hang on the door)
  • (All of the above, I found at the dollar store)
  • foam craft wreath
  • hot glue gun & glue sticks
  • toilet paper roll

Get Started on wreath:
Wrap the entire foam wreath with red ribbon hot glueing every couple of wraps to keep the ribbon nice and tight around the wreath. (this is the background so you dont see white through the candies.)
Next, begin glueing the red hots around the entire wreath. You want to cover the entire wreath minus the back that will be against the door. I think I did the inside ring, then the top and finished with the outside ring. (this is by far, the longest part of this project.)
Finish by sealing the candy with Mod Podge Dimensional Magic. I used a polyurethane spray and it did not dry clear. (I was not happy but hung it up anyway.)

Now for the rocket:
Measure, cut & wrap the first scrapbook paper around toilet paper roll.
Then, measure and cut about a 1" circle from the 2nd paper. Cut the circle about half way to the center. Overlap the paper at the cut to form a cone. At desired shape and size, either glue or staple the cone in place. Glue the cone on top of the toilet paper roll.
Use ribbon to finish off the bottom edge of toilet paper roll.
With remaining ribbon, take 2 or 3 coordinating colors and make loops to give the rocket a "take off" feel. Glue to the inside of the bottom of the rocket. Play with the loops to make it your style.
Finally, glue the rocket on to the bottom of the rocket. Where ever you like it best.

Hang it up:
To hang it up, I took a thicker red, white and blue ribbon and tied a bow. With the same ribbon, I wrapped a loop around the top and tied a know. I took my bow and glued it to the front. That made sure the bow was always facing front.

Jun 22, 2011

Car Seat Canopy Tutorial

This is a car seat canopy I made for my friend. These are super simple to make.

What will you need?
2 1/4 yards of coordinating fabrics
Velcro (Be sure its not the kind of the sticky back)
Matching thread for your decorative finishing.
  • Simply pin 2 coordinating fabrics measuring 35x43 (or whatever the width of the fabric is). You can make it as wide or long as you'd like, really.
  • Using a kitchenaide mixer (nice measurement huh?), trace a rounded edge on all 4 corners. Cut the fabric and pin together.
  • Beginning on the TOP edge, about 3 inches from the center, begin sewing 2 pieces (right sides together) about 1/4 inch seem AWAY from the center point all the way around the fabric. Be sure to stop about 3 inches away from center on the top edge where you started. (You need a hole to turn the fabric right side out.)
  • Turn the Fabric right sides out.
  • Finish off the opening, either by a technical blind stitch (that people claim is easy) or a simple top stich close to the edge. If you want it just for fun, this technique works great, but if you are professional, you will want to hide the stitch. :)
  • Finish the canopy by picking a fun stitch and sew about 1/4-1/2 inch from the edge, depending on your stitch and your style. If you dont want a fun stitch, or dont have the capability, just sew a straight line about 1/4 inch from the edge all the way around.
Now, on to the Straps. Besides the cutting, this is the hardest part. This is usually just made out of the bottom fabric. I like to use both. You want more of the bottom fabric showing than the top to get the contrast.
  • With the remaining fabric, cut 2 pieces of the bottom fabric about 2" x 6".
  • Cut 2 pieces of the top fabric about 1/2" x 6".
  • Take 1 piece of the 2x6 and 1 piece of the 1/2 x6 and sew right sides together to make a tube.
  • Before turning right side out, iron the tube flat so it has equal sides of the bottom fabric on top.
  • Sew one end of the tube and turn right side out.
  • Fold the other end in to give it a finished look. (It might be easier to work with if you iron this fold down.)
  • Take the rough side of your velcro and sew it on the top of the strap on the side that needs to be sewn together. (The side that you can see both fabrics)
  • Take the fuzzy side of the velcro (The side that only has the bottom fabric) and sew it on the bottom of the same strap on the end that is already finished the same distance away as you did the other piece. This is the top of the strap that will attach to the car seat handle.
  • Repeat each step above for the 2nd strap.
  • Once both straps are completed, sew them to the canopy 2 inches from the center point. The longer half will be your front side.


Dec 16, 2010

50+ Saying Block Letters...

As I mentioned in my last post, I participated in the Handmade Gift Exchange over at Craftaholics Anonymous. I was paired with the fabulous Angela over at Comfie Corner Crafts. I decided to make her these blocks I saw at a friends house awhile back. I've been wanting to make them for myself but still haven't gotten around to it. (Isn't that how it always turns out?)

Anyway, I've gotten a lot of great feedback on the blocks from my friends and family, I decided to do my first tutorial! And yes, I'm going to make these again.

First off, you start with 15 square blocks. You can do 2 1/2x2 1/2 or 3x3, whatever size you prefer. I think I used 3x3. I went to Lowe's and had them cut my wood down to size. I know places such as Wood Connection has square blocks already pre-cut, but are a little more expensive. Lowes does not charge to cut the wood.

Before you start your project, of course, you need to sand, sand, sand. This by far was the most time consuming part of the whole thing. You may want to use a power hand sander... I definitely will for the next time around. 15 blocks is a lot to sand... just saying.

Next, stain the blocks using a darker color stain. You really only need to do the edges because you are going to cover the sides in cute scrapbook paper.

After your stain has dried, cut your scrapbook paper down to size. On this one, I chose to put the same paper on the front and back, then another paper on the 2 sides, and another paper on the top. I think the next time I do it, I'm going to use the same paper on all 4 sides, then a different paper on the top. You can deifnitely do this anyway you want. I like the look of seeing the paper on top that you are using on the sides as well. It brings all the blocks together. (In my opinion.) Be sure not to cover the bottom, you need to write the number of the block on it. Also, because your blocks can be used YEAR ROUND, you probably want to avoid the seasonal paper prints.


Once you are done Mod Podge-ing the paper on, it's time to cut the letters. By this point, I was ready to be done. I wont lie. I used my trusty NEW Cricut (yes, I got a new one on Black Friday!) and I cut the letters out of vinyl using the Sure Cuts A Lot program. (If I haven't said it enough, I LOVE SCAL!) If you dont have this awesome program, you can use any letter cartridge or even just print and cut the letters out yourself. If you don't use vinyl, just use your trusty Mod Podge again and glue them on. I did this for the Christmas Tree and the other decals I wanted in a different color. Also, I used black for my letters, you can use any color you want. If you are lazy like me and decide to use vinyl, it might be a good idea to paint over them with Mod Podge (which I didn't do because again, I was ready to be DONE! HAHA.)


 As you are glueing/putting your letters on each block, be sure to number the bottom of each block. With the #'s 6 and 9, be sure to underline which the bottom is so you dont get them mixed up.


Once you are done, you can use the free downloadable cheat sheet to see what letter combinations will spell what! Below is another Christmas-y saying that you can create with your new blocks!! Check out the cheat sheet for other ideas. You can use them YEAR ROUND!