Aug 31, 2011

Muga & Grandma Mothers Day Blocks

I know, I'm SO behind. That's what happens when you have a baby... over 6 months ago. :) I saw these adorable blocks on somebody elses blog. (Please tell me if it's yours. I want to give you credit.) I just tried searching for it with no such luck. They were super easy and really cheap! My husband said we didn't need to do anything for his mom for mother's day. I went ahead and made this for my mom and showed him. His response was, "Oh, my mom Would Love something like that." So I whipped out another one that morning for her. And of course, she did Love it!

I took 2 square blocks (some my dad had out in his wood shop.) And 1 larger block, the same width as the squares. Painted them an antique white. Sanded and stained them. Then Mod Podged 2 of my favorite pictures of my baby on the front of the squares. Cut the vinyl lettering with my fabulous Cricut. (Can't live without it.) And stuck that on the front of the larger block. I Mod Podged over the vinyl just to make sure it stayed on there. I finished it off by tying a wire lined ribbon (that was tied around a baby gift) around it and tied it in a bow on top. What do you think?


My mom had a great idea, that I'm still planning on doing for her... maybe for Christmas. :) Get 12 more blocks and put all the grand kids picture on each block. Then you can stack them around the saying block. Just an idea.

Aug 16, 2011

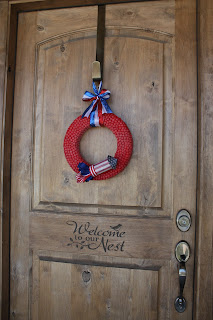
4th of July wreath

I saw this adorable 4th of July & (being in Utah) 24th of July wreath on Tatertots and Jello. Don't judge, hers turned out SOO much cuter than mine. :)


Items needed:
  • a couple bags of red hots
  • 2 festive scrapbook paper
  • red ribbon (to wrap around the wreath)
  • red & blue ribbon (to use on the rocket)
  • coordinating red, white and blue ribbon (to tie at the top to hang on the door)
  • (All of the above, I found at the dollar store)
  • foam craft wreath
  • hot glue gun & glue sticks
  • toilet paper roll

Get Started on wreath:
Wrap the entire foam wreath with red ribbon hot glueing every couple of wraps to keep the ribbon nice and tight around the wreath. (this is the background so you dont see white through the candies.)
Next, begin glueing the red hots around the entire wreath. You want to cover the entire wreath minus the back that will be against the door. I think I did the inside ring, then the top and finished with the outside ring. (this is by far, the longest part of this project.)
Finish by sealing the candy with Mod Podge Dimensional Magic. I used a polyurethane spray and it did not dry clear. (I was not happy but hung it up anyway.)

Now for the rocket:
Measure, cut & wrap the first scrapbook paper around toilet paper roll.
Then, measure and cut about a 1" circle from the 2nd paper. Cut the circle about half way to the center. Overlap the paper at the cut to form a cone. At desired shape and size, either glue or staple the cone in place. Glue the cone on top of the toilet paper roll.
Use ribbon to finish off the bottom edge of toilet paper roll.
With remaining ribbon, take 2 or 3 coordinating colors and make loops to give the rocket a "take off" feel. Glue to the inside of the bottom of the rocket. Play with the loops to make it your style.
Finally, glue the rocket on to the bottom of the rocket. Where ever you like it best.

Hang it up:
To hang it up, I took a thicker red, white and blue ribbon and tied a bow. With the same ribbon, I wrapped a loop around the top and tied a know. I took my bow and glued it to the front. That made sure the bow was always facing front.

Jun 22, 2011

Car Seat Canopy Tutorial

This is a car seat canopy I made for my friend. These are super simple to make.

What will you need?
2 1/4 yards of coordinating fabrics
Velcro (Be sure its not the kind of the sticky back)
Matching thread for your decorative finishing.
  • Simply pin 2 coordinating fabrics measuring 35x43 (or whatever the width of the fabric is). You can make it as wide or long as you'd like, really.
  • Using a kitchenaide mixer (nice measurement huh?), trace a rounded edge on all 4 corners. Cut the fabric and pin together.
  • Beginning on the TOP edge, about 3 inches from the center, begin sewing 2 pieces (right sides together) about 1/4 inch seem AWAY from the center point all the way around the fabric. Be sure to stop about 3 inches away from center on the top edge where you started. (You need a hole to turn the fabric right side out.)
  • Turn the Fabric right sides out.
  • Finish off the opening, either by a technical blind stitch (that people claim is easy) or a simple top stich close to the edge. If you want it just for fun, this technique works great, but if you are professional, you will want to hide the stitch. :)
  • Finish the canopy by picking a fun stitch and sew about 1/4-1/2 inch from the edge, depending on your stitch and your style. If you dont want a fun stitch, or dont have the capability, just sew a straight line about 1/4 inch from the edge all the way around.
Now, on to the Straps. Besides the cutting, this is the hardest part. This is usually just made out of the bottom fabric. I like to use both. You want more of the bottom fabric showing than the top to get the contrast.
  • With the remaining fabric, cut 2 pieces of the bottom fabric about 2" x 6".
  • Cut 2 pieces of the top fabric about 1/2" x 6".
  • Take 1 piece of the 2x6 and 1 piece of the 1/2 x6 and sew right sides together to make a tube.
  • Before turning right side out, iron the tube flat so it has equal sides of the bottom fabric on top.
  • Sew one end of the tube and turn right side out.
  • Fold the other end in to give it a finished look. (It might be easier to work with if you iron this fold down.)
  • Take the rough side of your velcro and sew it on the top of the strap on the side that needs to be sewn together. (The side that you can see both fabrics)
  • Take the fuzzy side of the velcro (The side that only has the bottom fabric) and sew it on the bottom of the same strap on the end that is already finished the same distance away as you did the other piece. This is the top of the strap that will attach to the car seat handle.
  • Repeat each step above for the 2nd strap.
  • Once both straps are completed, sew them to the canopy 2 inches from the center point. The longer half will be your front side.


Jun 1, 2011

Its time for another Handmade Gift Exchange!

I'm so excited! Linda from Craftaholics Anonymous is hosting your semi-annual Handmade Gift Exchange! I got to participate last November too. Here is the link to what I made and also received. If you want to participate as well, which I think you should, click the link below and it will take you there. Happy Exchanging. =)